# mpush
**Repository Path**: dhd_index/mpush
## Basic Information
- **Project Name**: mpush
- **Description**: mpush 消息推送Server
- **Primary Language**: Java
- **License**: Apache-2.0
- **Default Branch**: master
- **Homepage**: None
- **GVP Project**: No
## Statistics
- **Stars**: 0
- **Forks**: 431
- **Created**: 2017-05-24
- **Last Updated**: 2020-12-19
## Categories & Tags
**Categories**: Uncategorized
**Tags**: None
## README
## [详细教程](http://mpush.mydoc.io)
* 官网:[https://mpusher.github.io](https://mpusher.github.io)
* 文档:[http://mpush.mydoc.io](http://mpush.mydoc.io)
* QQ群:__114583699__  ## 源码
* group [https://github.com/mpusher/](https://github.com/mpusher/) 源代码空间
* server [https://github.com/mpusher/mpush](https://github.com/mpusher/mpush) 服务端源码
* alloc [https://github.com/mpusher/alloc](https://github.com/mpusher/alloc) 调度器源码
* mpns [https://github.com/mpusher/mpns](https://github.com/mpusher/mpns) 个性化推送中心源码
* java-client [https://github.com/mpusher/mpush-client-java](https://github.com/mpusher/mpush-client-java) 纯java客户端源码
* android sdk&demo [https://github.com/mpusher/mpush-android](https://github.com/mpusher/mpush-android) 安卓SDK和DEMO源码
* IOS sdk(swift) [https://github.com/mpusher/mpush-client-swift](https://github.com/mpusher/mpush-client-swift) swift版客户端源码
* IOS sdk(OC) [https://github.com/mpusher/mpush-client-oc](https://github.com/mpusher/mpush-client-oc) Object C 客户端源码
ps:由于源码分别在github和码云有两份,最新的代码以github为主
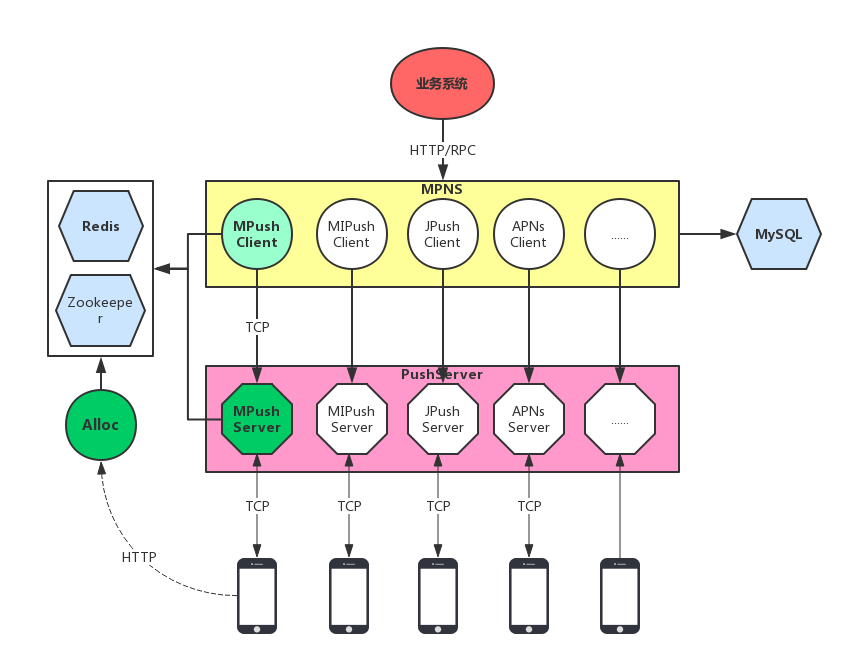
## 服务调用关系
## 源码测试
1. ```git clone https://github.com/mpusher/mpush.git```
2. 导入到eclipse或Intellij IDEA
3. 打开```mpush-test```模块,所有的测试代码都在该模块下
4. 修改配置文件```src/test/resource/application.conf```文件修改方式参照 服务部署第6点
5. 运行```com.mpush.test.sever.ServerTestMain.java```启动长链接服务
6. 运行```com.mpush.test.client.ConnClientTestMain.java``` 模拟一个客户端
7. 运行```com.mpush.test.push.PushClientTestMain``` 模拟给用户下发消息
8. 可以在控制台观察日志看服务是否正常运行,消息是否下发成功
## 服务部署
###### 说明:mpush 服务只依赖于zookeeper和redis,当然还有JDK>=1.8
1. 安装```jdk 1.8``` 以上版本并设置```%JAVA_HOME%```
2. 安装```zookeeper``` (安装配置步骤略)
3. 安装```Redis``` (安装配置步骤略)
4. 下载mpush server 最新的正式包[https://github.com/mpusher/mpush/releases](https://github.com/mpusher/mpush/releases)
5. 解压下载的tar包`tar -zvxf mpush-release-0.0.2.tar.gz`到 mpush 目录, 结构如下
>
## 源码
* group [https://github.com/mpusher/](https://github.com/mpusher/) 源代码空间
* server [https://github.com/mpusher/mpush](https://github.com/mpusher/mpush) 服务端源码
* alloc [https://github.com/mpusher/alloc](https://github.com/mpusher/alloc) 调度器源码
* mpns [https://github.com/mpusher/mpns](https://github.com/mpusher/mpns) 个性化推送中心源码
* java-client [https://github.com/mpusher/mpush-client-java](https://github.com/mpusher/mpush-client-java) 纯java客户端源码
* android sdk&demo [https://github.com/mpusher/mpush-android](https://github.com/mpusher/mpush-android) 安卓SDK和DEMO源码
* IOS sdk(swift) [https://github.com/mpusher/mpush-client-swift](https://github.com/mpusher/mpush-client-swift) swift版客户端源码
* IOS sdk(OC) [https://github.com/mpusher/mpush-client-oc](https://github.com/mpusher/mpush-client-oc) Object C 客户端源码
ps:由于源码分别在github和码云有两份,最新的代码以github为主
## 服务调用关系

## 源码测试
1. ```git clone https://github.com/mpusher/mpush.git```
2. 导入到eclipse或Intellij IDEA
3. 打开```mpush-test```模块,所有的测试代码都在该模块下
4. 修改配置文件```src/test/resource/application.conf```文件修改方式参照 服务部署第6点
5. 运行```com.mpush.test.sever.ServerTestMain.java```启动长链接服务
6. 运行```com.mpush.test.client.ConnClientTestMain.java``` 模拟一个客户端
7. 运行```com.mpush.test.push.PushClientTestMain``` 模拟给用户下发消息
8. 可以在控制台观察日志看服务是否正常运行,消息是否下发成功
## 服务部署
###### 说明:mpush 服务只依赖于zookeeper和redis,当然还有JDK>=1.8
1. 安装```jdk 1.8``` 以上版本并设置```%JAVA_HOME%```
2. 安装```zookeeper``` (安装配置步骤略)
3. 安装```Redis``` (安装配置步骤略)
4. 下载mpush server 最新的正式包[https://github.com/mpusher/mpush/releases](https://github.com/mpusher/mpush/releases)
5. 解压下载的tar包`tar -zvxf mpush-release-0.0.2.tar.gz`到 mpush 目录, 结构如下
>
   >drwxrwxr-x 2 shinemo shinemo  4096 Aug 20 09:30 bin —> 启动脚本
   >drwxrwxr-x 2 shinemo shinemo  4096 Aug 20 09:52 conf —> 配置文件
   >drwxrwxr-x 2 shinemo shinemo  4096 Aug 20 09:29 lib —> 核心类库
   >-rw-rw-r-- 1 shinemo shinemo 11357 May 31 11:07 LICENSE
   >drwxrwxr-x 2 shinemo shinemo  4096 Aug 20 09:32 logs —> 日志目录
   >-rw-rw-r-- 1 shinemo shinemo    21 May 31 11:07 README.md
   >drwxrwxr-x 2 shinemo shinemo  4096 Aug 20 09:52 tmp
   >
6. 修改 conf 目录下的 ```vi mpush.conf```文件, ```mpush.conf```里的配置项会覆盖同目录下的```reference.conf```文件
```java
#主要修改以下配置
mp.net.connect-server-port=3000//长链接服务对外端口, 公网端口
mp.zk.server-address="127.0.0.1:2181"//zk 机器的地址
mp.redis={//redis 相关配置
nodes:["127.0.0.1:6379"] //格式是ip:port
cluster-model:single //single, cluster
}
//还有用于安全加密的RSA mp.security.private-key 和 mp.security.public-key 等...
```
如果要修改其他配置请参照reference.conf文件
7. 给bin目录下的脚本增加执行权限```chmod u+x *.sh```
8. 执行```./mp.sh start``` 启动服务, 查看帮助```./mp.sh``` 目前支持的命令:
```Usage: ./mp.sh {start|start-foreground|stop|restart|status|upgrade|print-cmd}```
```set-env.sh``` 用于增加和修改jvm启动参数,比如堆内存、开启远程调试端口、开启jmx等
9. ```cd logs```目录,```cat mpush.out```查看服务是否启动成功
10. 集成部署,比如集成到现有web工程一起部署到tomcat,可以添加如下依赖
```xml
com.github.mpusher
mpush-boot
0.0.2
```
启动入口`com.mpush.bootstrap.ServerLauncher.java`
## 配置文件详解
```java
##################################################################################################################
#
# NOTICE:
#
# 系统配置文件,所有列出的项是系统所支持全部配置项
# 如果要覆盖某项的值可以添加到mpush.conf中。
#
# 配置文件格式采用HOCON格式。解析库由https://github.com/typesafehub/config提供。
# 具体可参照器说明文档,比如含有特殊字符的字符串必须用双引号包起来。
#
##############################################################################################################
mp {
#日志配置
log.level=warn
log.dir=${user.dir}/../logs
#核心配置
core {
max-packet-size=10k //系统允许传输的最大包的大小
compress-threshold=10k //数据包启用压缩的临界值,超过该值后对数据进行压缩
min-heartbeat=3m //最小心跳间隔
max-heartbeat=3m //最大心跳间隔
max-hb-timeout-times=2 //允许的心跳连续超时的最大次数
session-expired-time=1d //用于快速重连的session 过期时间默认1天
epoll-provider=netty //nio:jdk自带,netty:由netty实现
}
#安全配置
security {
#rsa 私钥, 公钥 key长度为1024;生成方式可以使用open-ssh或者使用工具类com.mpush.tools.crypto.RSAUtils#main
private-key="MIIBNgIBADANBgkqhkiG9w0BAQEFAASCASAwggEcAgEAAoGBAKCE8JYKhsbydMPbiO7BJVq1pbuJWJHFxOR7L8Hv3ZVkSG4eNC8DdwAmDHYu/wadfw0ihKFm2gKDcLHp5yz5UQ8PZ8FyDYvgkrvGV0ak4nc40QDJWws621dm01e/INlGKOIStAAsxOityCLv0zm5Vf3+My/YaBvZcB5mGUsPbx8fAgEAAoGAAy0+WanRqwRHXUzt89OsupPXuNNqBlCEqgTqGAt4Nimq6Ur9u2R1KXKXUotxjp71Ubw6JbuUWvJg+5Rmd9RjT0HOUEQF3rvzEepKtaraPhV5ejEIrB+nJWNfGye4yzLdfEXJBGUQzrG+wNe13izfRNXI4dN/6Q5npzqaqv0E1CkCAQACAQACAQACAQACAQA="
public-key="MIGfMA0GCSqGSIb3DQEBAQUAA4GNADCBiQKBgQCghPCWCobG8nTD24juwSVataW7iViRxcTkey/B792VZEhuHjQvA3cAJgx2Lv8GnX8NIoShZtoCg3Cx6ecs+VEPD2fBcg2L4JK7xldGpOJ3ONEAyVsLOttXZtNXvyDZRijiErQALMTorcgi79M5uVX9/jMv2Ggb2XAeZhlLD28fHwIDAQAB"
aes-key-length=16 //AES key 长度
ras-key-length=1024 //RSA key 长度
}
#网络配置
net {
connect-server-port=3000 //长链接服务对外端口, 公网端口
gateway-server-port=3001 //网关服务端口, 内部端口
admin-server-port=3002 //控制台服务端口, 内部端口
public-host-mapping { //本机局域网IP和公网IP的映射关系
"127.0.0.1":"111.1.32.137"
}
traffic-shaping { //流量整形配置
gateway-client {
enabled:true
check-interval:100ms
write-global-limit:1k
read-global-limit:0
write-channel-limit:256b
read-channel-limit:0
}
gateway-server {
enabled:true
check-interval:100ms
write-global-limit:0
read-global-limit:10k
write-channel-limit:0
read-channel-limit:0.5k
}
connect-server {
enabled:false
check-interval:100ms
write-global-limit:0
read-global-limit:100k
write-channel-limit:3k
read-channel-limit:3k
}
}
}
#Zookeeper配置
zk {
server-address="127.0.0.1:2181"
namespace=mpush
digest=mpush
local-cache-path=/
retry {
#initial amount of time to wait between retries
baseSleepTimeMs=3s
#max number of times to retry
maxRetries=3
#max time in ms to sleep on each retry
maxSleepMs=5s
}
connectionTimeoutMs=5s
sessionTimeoutMs=5s
}
#Redis集群配置
redis {
write-to-zk=true
#redis 集群配置,group 是个二维数组,第一层表示有多少组集群,每个集群下面可以有多台机器
cluster-group:[
[
{
host:"127.0.0.1"
port:2181
password:ShineMoIpo
}
]
]
config {
maxTotal:8,
maxIdle:4,
minIdle:1,
lifo:true,
fairness:false,
maxWaitMillis:5000,
minEvictableIdleTimeMillis:300000,
softMinEvictableIdleTimeMillis:1800000,
numTestsPerEvictionRun:3,
testOnCreate:false,
testOnBorrow:false,
testOnReturn:false,
testWhileIdle:false,
timeBetweenEvictionRunsMillis:60000,
blockWhenExhausted:true,
jmxEnabled:true,
jmxNamePrefix:pool,
jmxNameBase:pool
}
}
#HTTP代理配置
http {
proxy-enabled=false //启用Http代理
max-conn-per-host=5 //每个域名的最大链接数, 建议web服务nginx超时时间设长一点, 以便保持长链接
default-read-timeout=10s //请求超时时间
max-content-length=5m //response body 最大大小
dns-mapping { //域名映射外网地址转内部IP
"mpush.com":["127.0.0.1:8080", "127.0.0.1:8081"]
}
}
#线程池配置
thread {
pool {
boss { //netty boss
min:4
max:16
queue-size:1000
}
work { //netty boss
min:8
max:32
queue-size:1000
}
event-bus {
min:4
max:4
queue-size:10000 //大量的online,offline,
}
http-proxy {
min:8
max:64
queue-size:1000
}
biz { //其他业务
min:4
max:64
queue-size:10
}
mq { //用户上下线消息, 踢人等
min:2
max:4
queue-size:10000
}
push-callback { //消息推送
min:2
max:2
queue-size:0
}
}
}
#系统监控配置
monitor {
dump-dir=/tmp/logs/mpush/
dump-stack=false //是否定时dump堆栈
dump-period=1m //多久监控一次
print-log=true //是否打印监控日志
}
#SPI扩展配置
spi {
thread-pool-factory:"com.mpush.tools.thread.pool.DefaultThreadPoolFactory"
dns-mapping-manager:"com.mpush.common.net.HttpProxyDnsMappingManager"
}
}
```
11. 未完待续...