
模块化的快速开发框架


 ,功能完善,模块市场丰富,欢迎交流。
QQ交流群:467107293
## 💡 系统简介
`ModStart` 是一个基于 `Laravel` 模块化快速开发框架。基于 Apache 2.0 开源协议发布,**免费且不限制商业使用**。模块市场包含了丰富的模块,后台一键快速安装,让开发者能够从冗长的代码中提效。
,功能完善,模块市场丰富,欢迎交流。
QQ交流群:467107293
## 💡 系统简介
`ModStart` 是一个基于 `Laravel` 模块化快速开发框架。基于 Apache 2.0 开源协议发布,**免费且不限制商业使用**。模块市场包含了丰富的模块,后台一键快速安装,让开发者能够从冗长的代码中提效。
 - [官方网站](https://modstart.com)
- [在线演示](https://cms.demo.tecmz.com)
- [模块市场](https://modstart.com/store)
- [源码地址 / Gitee](https://gitee.com/modstart/ModStartCMS)
- [源码地址 / GitHub](https://github.com/modstart/ModStartCMS)
**技术栈**
- [Laravel](https://laravel.com/)
- [jQuery](http://jquery.com)
- [Vue](https://vuejs.org/)
- [Element UI](https://element.eleme.io/)
- [LayUI](https://github.com/sentsin/layui)
## 💥 系统特性
- 简洁优雅、灵活可扩展
- 后台RBAC权限管理
- 模块化开发,积木式搭建系统
- 组件按需加载静态资源
- 丰富的数据表格、数据表单功能
- 内置文件上传,无需繁琐的开发
- 丰富的模块市场,后台一键快速安装
## 🎨 系统演示
### 前台演示地址
[http://cms.demo.tecmz.com/](http://cms.demo.tecmz.com/)
> 用户密码自行注册使用
### 后台演示地址
[http://cms.demo.tecmz.com/admin](http://cms.demo.tecmz.com/admin)
> 账号:`demo` 密码:`123456` (演示账号只可以查看不能操作)
## 🌐 开发文档
[https://modstart.com/doc](https://modstart.com/doc)
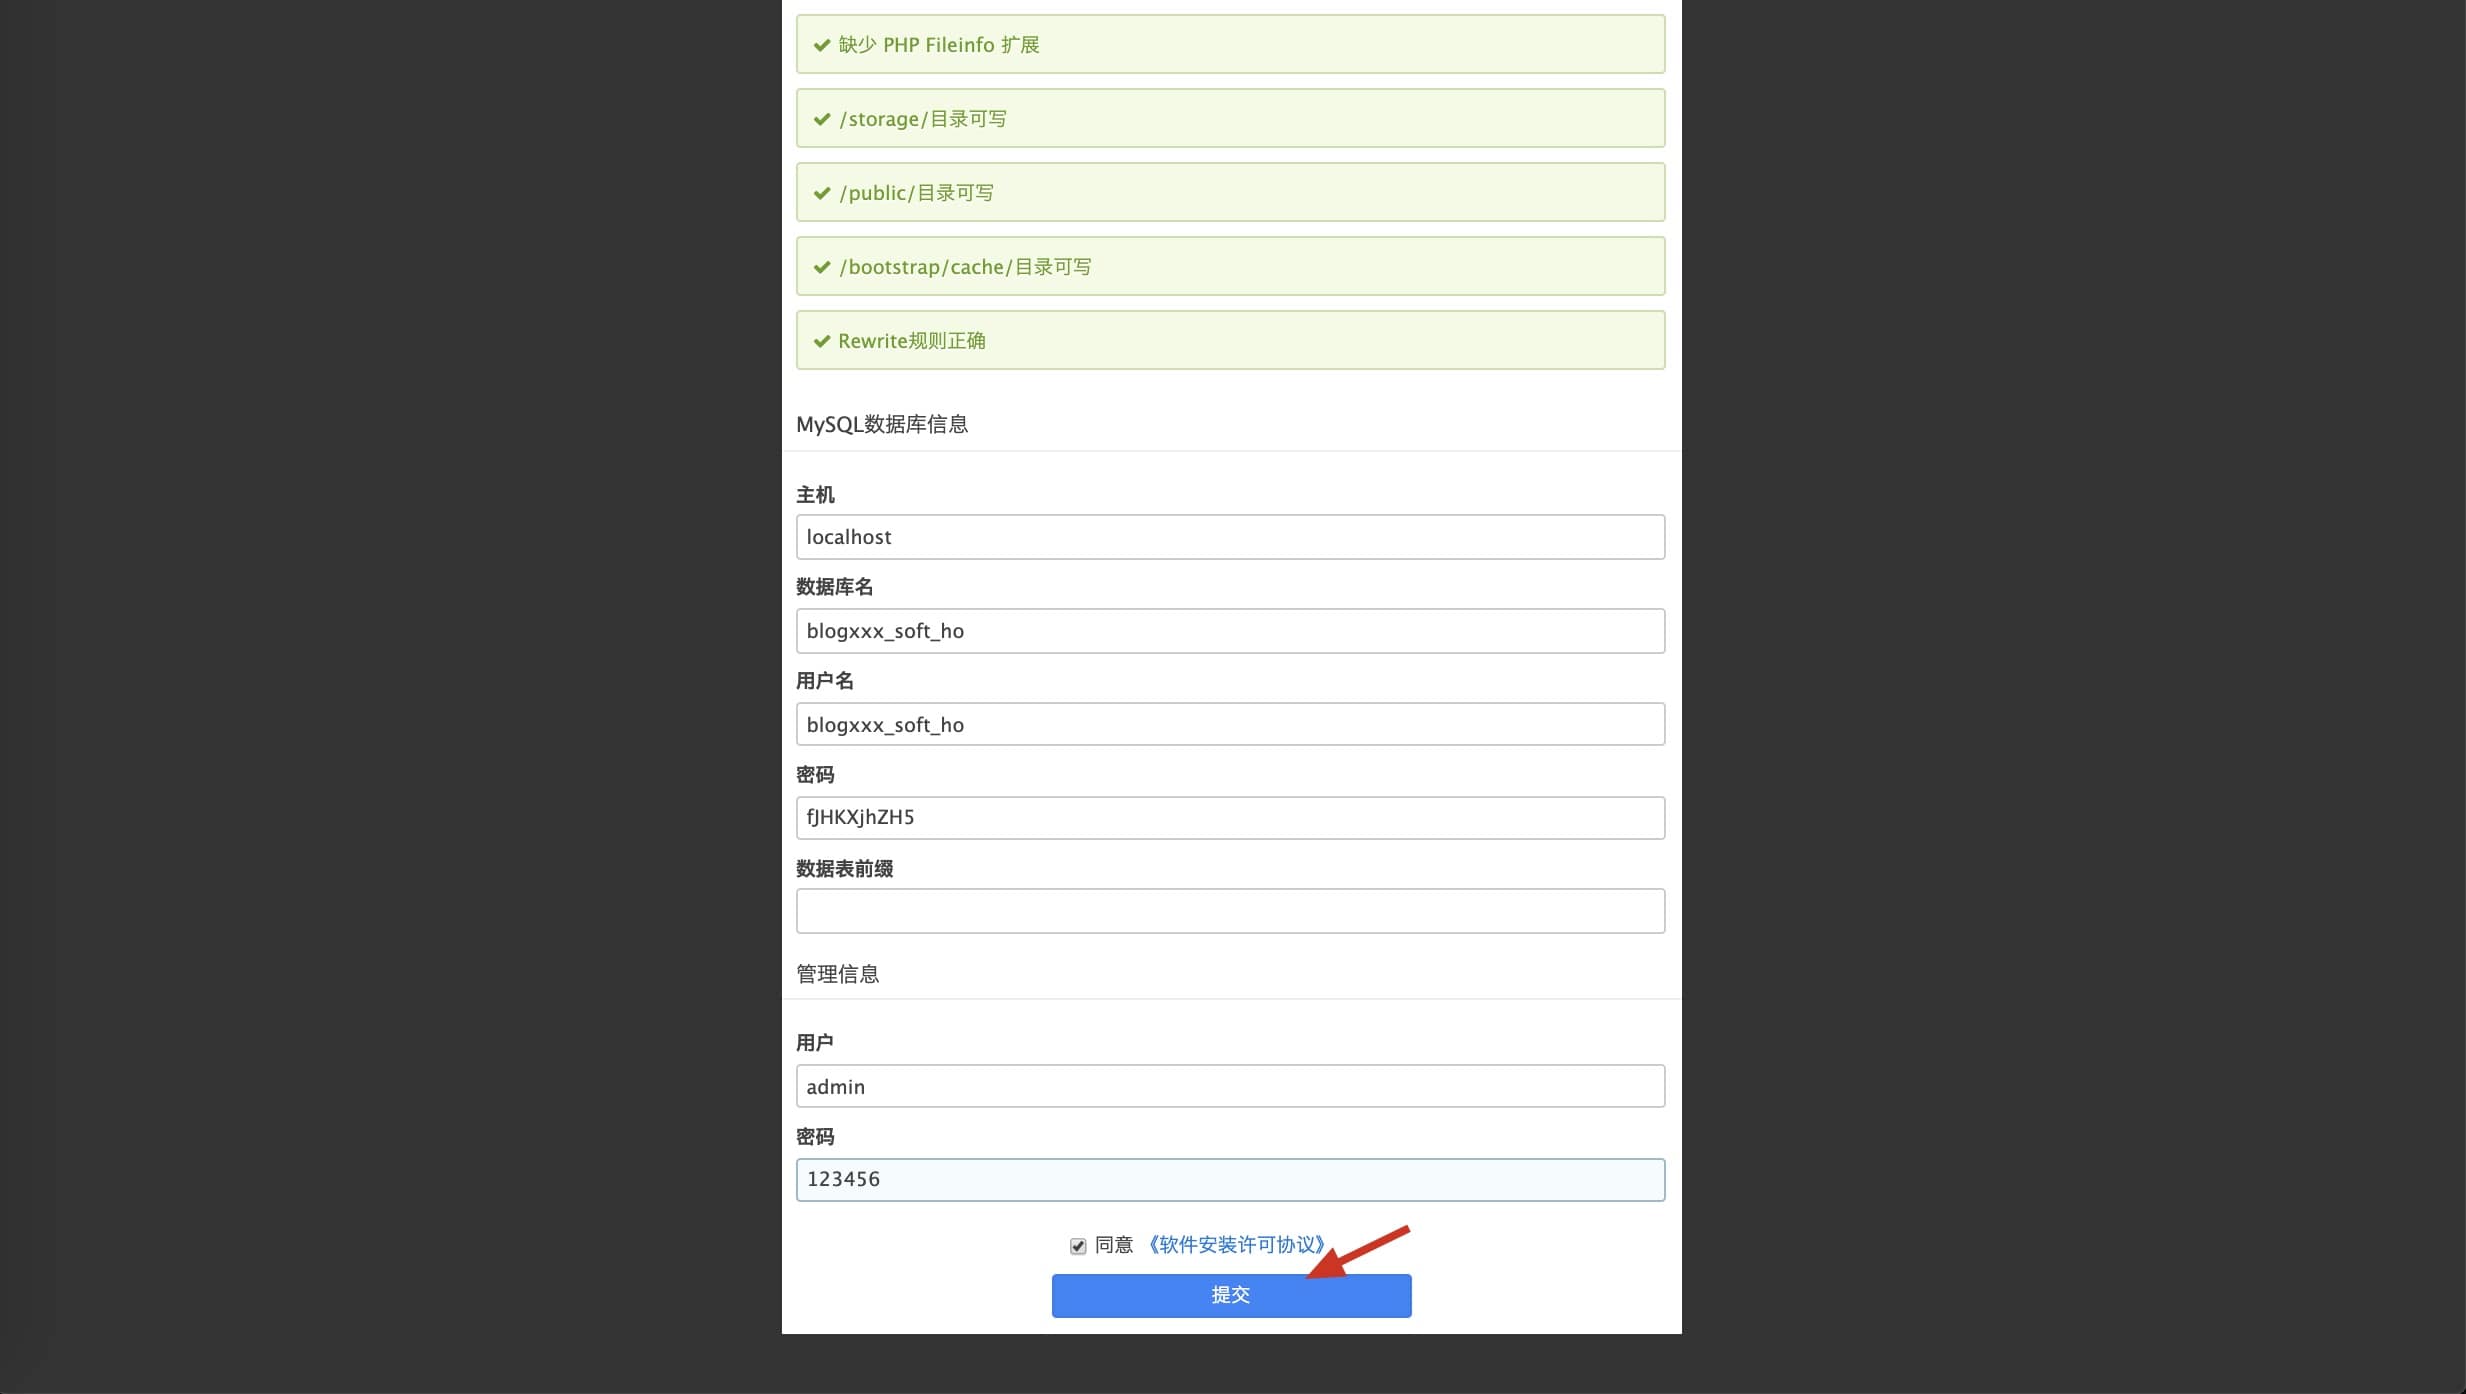
## 🔧 系统安装
### 环境要求
- `PHP` `5.6 或 7.0`
- `MySQL` `>=5.0`
- `PHP Extension`:`Fileinfo`
- `Apache/Nginx`
> 强力推荐使用PHP 5.6 或 7.0 版本,系统稳定性最好
### 安装步骤
1. 配置 apache/nginx 服务器,请将网站的根目录配置到 <网站目录>/public
2. 访问 `http://www.xxx.com/install.php`
3. 使用安装引导向导进行安装
- [官方网站](https://modstart.com)
- [在线演示](https://cms.demo.tecmz.com)
- [模块市场](https://modstart.com/store)
- [源码地址 / Gitee](https://gitee.com/modstart/ModStartCMS)
- [源码地址 / GitHub](https://github.com/modstart/ModStartCMS)
**技术栈**
- [Laravel](https://laravel.com/)
- [jQuery](http://jquery.com)
- [Vue](https://vuejs.org/)
- [Element UI](https://element.eleme.io/)
- [LayUI](https://github.com/sentsin/layui)
## 💥 系统特性
- 简洁优雅、灵活可扩展
- 后台RBAC权限管理
- 模块化开发,积木式搭建系统
- 组件按需加载静态资源
- 丰富的数据表格、数据表单功能
- 内置文件上传,无需繁琐的开发
- 丰富的模块市场,后台一键快速安装
## 🎨 系统演示
### 前台演示地址
[http://cms.demo.tecmz.com/](http://cms.demo.tecmz.com/)
> 用户密码自行注册使用
### 后台演示地址
[http://cms.demo.tecmz.com/admin](http://cms.demo.tecmz.com/admin)
> 账号:`demo` 密码:`123456` (演示账号只可以查看不能操作)
## 🌐 开发文档
[https://modstart.com/doc](https://modstart.com/doc)
## 🔧 系统安装
### 环境要求
- `PHP` `5.6 或 7.0`
- `MySQL` `>=5.0`
- `PHP Extension`:`Fileinfo`
- `Apache/Nginx`
> 强力推荐使用PHP 5.6 或 7.0 版本,系统稳定性最好
### 安装步骤
1. 配置 apache/nginx 服务器,请将网站的根目录配置到 <网站目录>/public
2. 访问 `http://www.xxx.com/install.php`
3. 使用安装引导向导进行安装
 ### 升级指南
参照 [https://modstart.com/doc/install/upgrade.html](https://modstart.com/doc/install/upgrade.html)
### 版本策略
ModStart 的版本发行将会参考主流 web 框架的发行策略,尽量降低版本升级带来的影响,最大程度的考虑兼容性问题,小版本的升级将尽量不改动任何功能接口;同时我们也将会提供更新日志,详细说明新版本的改动以及可能造成的影响。
对于小版本的发行,开发者可以放心的升级,基本不用担心代码兼容性问题。只有像从 v2.0.0 到 v3.0.0 这样的大版本升级才可能会有兼容性问题,小版本则基本是完全兼容的(小版本升级也可能会有不兼容的情况,但几率很小)。
## 🔨 快速开发
以一个增删改查页面的基本构成,通过学习下面的内容将可以帮助大家快速理解 `ModStart` 基本使用方法。
### 创建数据表
在Laravel的迁移目录创建数据库迁移文件
```php
class CreateNews extends Migration
{
public function up()
{
Schema::create('news', function (Blueprint $table) {
$table->increments('id');
$table->timestamps();
$table->string('title', 200)->nullable()->comment('');
$table->string('cover', 200)->nullable()->comment('');
$table->string('summary', 200)->nullable()->comment('');
$table->text('content')->nullable()->comment('');
});
}
}
public function down()
{
}
}
```
### 创建控制器
增加路由控制器代码,同时按照
```php
class NewsController extends Controller
{
use HasAdminQuickCRUD;
protected function crud(AdminCRUDBuilder $builder)
{
$builder
->init('news')
->field(function ($builder) {
$builder->id('id','ID');
$builder->text('title', '名称');
$builder->image('cover', '封面');
$builder->textarea('summary', '摘要');
$builder->richHtml('content', '内容');
$builder->display('created_at', '创建时间');
$builder->display('updated_at', '更新时间');
})
->gridFilter(function (GridFilter $filter) {
$filter->eq('id', 'ID');
$filter->like('title', '标题');
})
->title('新闻管理');
}
}
```
### 增加路由和导航
在 `routes.php` 增加路由信息
```php
$router->match(['get', 'post'], 'news/news', 'NewsController@index');
$router->match(['get', 'post'], 'news/news/add', 'NewsController@add');
$router->match(['get', 'post'], 'news/news/edit', 'NewsController@edit');
$router->match(['get', 'post'], 'news/news/delete', 'NewsController@delete');
$router->match(['get', 'post'], 'news/news/show', 'NewsController@show');
```
在 `ModuleServiceProvider.php` 中注册菜单信息
```php
AdminMenu::register(function () {
return [
[
'title' => '新闻管理',
'icon' => 'list',
'sort' => 150,
'url' => '\App\Admin\Controller\NewsController@index',
]
];
});
```
这样一个简单的增删改查页面就开发完成了
## 🌭 开发前必读
### 开发前的配置
开发环境请打开 debug 模式,方便查看日志文件,操作方式如下:
在 `.env` 文件中设置 `APP_DEBUG=true`
## 📋 常见问题
我们列举了常见问题,请查看官方标准指南
[https://modstart.com/doc/install/qa.html](https://modstart.com/doc/install/qa.html)
如有其他问题推荐使用官方讨论交流群或在线讨论
[https://modstart.com/forum](https://modstart.com/forum)
## ✨ 使用交流
### 加入我们
如果您对这个项目感兴趣,非常欢迎加入项目开发团队,参与这个项目的功能维护与开发。
欢迎任何形式的贡献(包括但不限于以下):
- 贡献代码
- 完善文档
- 撰写教程
- 完善注释
- ...
### QQ交流群
**QQ交流群:467107293**
### 升级指南
参照 [https://modstart.com/doc/install/upgrade.html](https://modstart.com/doc/install/upgrade.html)
### 版本策略
ModStart 的版本发行将会参考主流 web 框架的发行策略,尽量降低版本升级带来的影响,最大程度的考虑兼容性问题,小版本的升级将尽量不改动任何功能接口;同时我们也将会提供更新日志,详细说明新版本的改动以及可能造成的影响。
对于小版本的发行,开发者可以放心的升级,基本不用担心代码兼容性问题。只有像从 v2.0.0 到 v3.0.0 这样的大版本升级才可能会有兼容性问题,小版本则基本是完全兼容的(小版本升级也可能会有不兼容的情况,但几率很小)。
## 🔨 快速开发
以一个增删改查页面的基本构成,通过学习下面的内容将可以帮助大家快速理解 `ModStart` 基本使用方法。
### 创建数据表
在Laravel的迁移目录创建数据库迁移文件
```php
class CreateNews extends Migration
{
public function up()
{
Schema::create('news', function (Blueprint $table) {
$table->increments('id');
$table->timestamps();
$table->string('title', 200)->nullable()->comment('');
$table->string('cover', 200)->nullable()->comment('');
$table->string('summary', 200)->nullable()->comment('');
$table->text('content')->nullable()->comment('');
});
}
}
public function down()
{
}
}
```
### 创建控制器
增加路由控制器代码,同时按照
```php
class NewsController extends Controller
{
use HasAdminQuickCRUD;
protected function crud(AdminCRUDBuilder $builder)
{
$builder
->init('news')
->field(function ($builder) {
$builder->id('id','ID');
$builder->text('title', '名称');
$builder->image('cover', '封面');
$builder->textarea('summary', '摘要');
$builder->richHtml('content', '内容');
$builder->display('created_at', '创建时间');
$builder->display('updated_at', '更新时间');
})
->gridFilter(function (GridFilter $filter) {
$filter->eq('id', 'ID');
$filter->like('title', '标题');
})
->title('新闻管理');
}
}
```
### 增加路由和导航
在 `routes.php` 增加路由信息
```php
$router->match(['get', 'post'], 'news/news', 'NewsController@index');
$router->match(['get', 'post'], 'news/news/add', 'NewsController@add');
$router->match(['get', 'post'], 'news/news/edit', 'NewsController@edit');
$router->match(['get', 'post'], 'news/news/delete', 'NewsController@delete');
$router->match(['get', 'post'], 'news/news/show', 'NewsController@show');
```
在 `ModuleServiceProvider.php` 中注册菜单信息
```php
AdminMenu::register(function () {
return [
[
'title' => '新闻管理',
'icon' => 'list',
'sort' => 150,
'url' => '\App\Admin\Controller\NewsController@index',
]
];
});
```
这样一个简单的增删改查页面就开发完成了
## 🌭 开发前必读
### 开发前的配置
开发环境请打开 debug 模式,方便查看日志文件,操作方式如下:
在 `.env` 文件中设置 `APP_DEBUG=true`
## 📋 常见问题
我们列举了常见问题,请查看官方标准指南
[https://modstart.com/doc/install/qa.html](https://modstart.com/doc/install/qa.html)
如有其他问题推荐使用官方讨论交流群或在线讨论
[https://modstart.com/forum](https://modstart.com/forum)
## ✨ 使用交流
### 加入我们
如果您对这个项目感兴趣,非常欢迎加入项目开发团队,参与这个项目的功能维护与开发。
欢迎任何形式的贡献(包括但不限于以下):
- 贡献代码
- 完善文档
- 撰写教程
- 完善注释
- ...
### QQ交流群
**QQ交流群:467107293**